Tuesday, November 27, 2012

Apple Raisin Muffins

After trying many different "healthy toddler muffins" (all of which I might add my toddler loved), I have decided that these are the easiest, pretty healthy and very tasty.  I found this recipe on allrecipes.com and altered it slightly according to our tastes and what we had on hand.  You can find the link to the original recipe at the bottom of the post. I loved this particular recipe b/c I usually have all the ingredients on hand.  These are easy, moist and, best of all, delicious!

Apple Raisin Muffins

1 1/4 c flour
3/4 c whole wheat flour
1 c white sugar
1 tbs cinnamon
2 tsp baking powder
1/2 tsp baking soda
1/2 tsp salt

3 eggs
1/4 c oil
1 c unsweetened applesauce
1 tbs vanilla

4 carrots finely grated
Toasted wheat germ for topping

Directions
Preheat oven to 375 degrees. Prepare your muffin tins* using non-stick spray or muffin liners.  In a medium bowl mix the flours, sugar, cinnamon, baking powder, baking soda and salt together.  In a separate bowl or your mixer whisk eggs and oil together. Add applesauce and vanilla.  Gently stir in your carrots, apple pieces and raisins.  Slowly add the flour mixture to the batter and stir just until moistened.  Fill your muffin tins 3/4 of the way full and sprinkle wheat germ on top before placing in the oven.  Bake at 375 for 10-12min.

*I use mini muffin tins. For larger muffins bake 15-20min.


Source to original recipe
http://allrecipes.com/recipe/morning-glory-muffins-i/detail.aspx?event8=1&prop24=SR_Title&e11=muffins&e8=Quick%20Search&event10=1&e7=Home%20Page

Monday, October 15, 2012

Free Starbucks Today 

Starbucks Caffe Latte
Free Caffe Latte today at participating Starbucks from 4-6....Yay!
Click here for more details. 

Earflap hats and booties

OHIO STATE baby hat and booties for an infant!  Makes such a cute baby gift.  Can't decide if it looks more like Ohio State or like Christmas but all for the same season I guess.
I used this earflap hat pattern
http://allicrafts.blogspot.com/2011/02/free-pattern-baby-earflap-hat-newborn.html
and
this one for the boots (although I made a couple of changes to make them less girly and more footbally)
http://imtopsyturvy.com/crochet-wrap-button-infant-boots-girls-boys/

Another baby gift for my 'coming soon' niece.  Used the same patterns as above except added a border of single crochets in the white fluffy yarn.  


Tuesday, September 25, 2012

Kitchen table redo

We have been looking at kitchen tables for a while now for the eat-in area in our kitchen.  Before our child we used it as a sun-room with a couch and rocking chair, the best coffee drinking spot in the house. Now it seems more practical to have a kitchen table so we can sit and eat meals in the kitchen instead of  the dining room (which for some unknown reason has carpet!....project for way down the road).  I finally found a table that I loved at Crate and Barrel that was hmm slightly out of budget. http://www.crateandbarrel.com/avalon-45-black-extension-dining-table/s241787.  But not one to give up so easily I found this one on craigslist and talked them down to less than $100.  A little sanding and paint and TaDa.  Now to figure out the chair situation...


Sunday, September 23, 2012

Little Girl Dresser Project

My new favorite pastime is redoing old furniture so here is a look at my latest project.  My little girl has finally gotten to the point where she needs a dresser.  The bins and baskets I used for her baby clothes don't hold near as many toddler clothes...shocking right?  Anyways I looked at dressers but nothing really seemed to fit and I wanted something that would make the transition from nursery to her little girl room.  An old hand-me-down lingerie dresser that has been sitting empty in guest room was the perfect size for her room just not the right color.  So hence my next project...
This is the only before picture I took (ugh sorry).  It is only of the drawers but the rest of the dresser looks the same as these drawers.  First step for me is always to sand, sand and sand! It's annoying and dusty but necessary.  I would definitely recommend buying a sander.   You can find some that are pretty inexpensive and still work great.  This is the one I use "1/4"" Finishing Sander QS900"  and I got it on sale at Amazon for around $25.  Someday I would like to upgrade to an orbital sander but for the money this one is just perfect.  


Next step is to prime the drawers and dresser.  I apply primer in super thin coats and use about 3 coats to fully cover everything.  Make sure you allow for plenty of drying time in between coats.  Next I paint!  After lots of back and forth I finally decided on white with a small pink border around the drawers.  I always have a tough time actually committing to a color...(which is why the all the walls in my house are still white).  I use the same system with the paint as I do with the primer.  Thin coats, lots of drying time in between and as many as it takes to get it fully covered.  

My next step was the hardware.  I scoured the internet for hours searching for the perfect handles but couldn't find anything that was both adorable and in my budget.  So out came the spray paint. 


I sprayed the original handles silver and added a sparkly gem to the center with a hot glue gun.  Loved the way they turned out.
...And the finished product!!


Bulletin Board to Jewelry Storage


So I have been looking for a way to use some leftover bulletin boards just sitting in my garage.  Creating a jewelry board seemed like a good idea so here is my attempt to do just that.  This project took maybe 20min to complete and that includes gathering up the supplies. 
Supplies: 
cork board
fabric (I used a scrap piece I picked up in the clearance section for less than $1)
scissors 
paint scraper (or some other thin blade type tool...a butter knife would probably work in a pinch)
paint and brush for the frame 


 Before

Painted the frame white


After the frame is painted and dry, start tucking your fabric.  Start in one corner and use your flat blade tool to tuck the fabric in between the frame and board. Make sure you are keeping your fabric tight and smooth as you tuck in.  I didn't cut my fabric until I had the top and one side all tucked in tightly.  Then the cut the bottom and other side using the edge of the frame as my guide.  This left me with enough fabric to finish tucking in those two sides.  Just make sure you are smoothing out any creases and keeping your fabric pulled tight as you tuck.  

After

I used old stud earrings that I no longer wear instead of thumb tacks to hold up my necklaces and such.  

Wednesday, August 15, 2012

Patchwork Camera Strap

Well it took me a while but I have finally opened the sewing machine I received as a wedding gift 4 years ago. It is a pretty basic model Singer 8-Stitch Sewing Machine .  Having never sewn anything in my life it seemed like an impossibly daunting task.  But I have been lusting over all the handmade (w/ a sewing machine) items on pinterest and esty long enough.  It was seriously time for me to get some motivation and teach myself to sew!  So here is my first finished project.  The hardest part of the whole project was actually setting up the machine.  Once I got that figured out the rest went surprisingly smooth. It took me 2 days only because I started without having all the materials needed, typical, so I had to fit a trip into Joanns in there somewhere.  I love the result and can't wait to start some new projects.  


 I looked at tons of different camera strap tutorials but the best one I found, at least for a beginner like me, was this one,  http://littlebiggirlstudio.blogspot.com/2010/08/tutorial-camera-strap-cover-with-lens.html .
 The only part I didn't understand was the topstitch so I found a good explanation here http://www.themotherhuddle.com/topstitching-101-the-what-and-how-of-a-topstitch/  


Only problem is I'm not sure how my husband will feel about carrying the camera around now....hopefully the comfort of the the strap will win him over.

Monday, August 13, 2012

Treat Receipt Time!

Love love love this time of year.  As if I needed an excuse to stop at Starbucks twice in one day...
Now if only we could get a drive-through at the Starbucks here!
Starbucks Treat Receipt

http://www.starbucks.com/promo/treat-receipt?utm_source=homepage&utm_medium=web&utm_campaign=Summer2FY12

Chocolate Chip Oatmeal Cookies

These are not your traditional oatmeal cookies but more of a chocolate chip cookie with a little oatmeal added.  They are a much healthier version of a plain old chocolate chip recipe.  It uses half as much butter as most traditional recipes. To make an even lower calorie version use only the egg whites instead of the whole egg.  I personally prefer to use the whole egg but the cookie turns out delish either way.

Chocolate Chip Oatmeal Cookies

1/2 c butter
1/2 c sugar
3/4 c brown sugar
2 eggs
1 1/2 t vanilla

1 1/2 c flour
1 t baking soda
1/2 t salt
1 c rolled oats

1 c dark chocolate chips

Preheat oven to 350 degrees.
Cream together the butter and sugars.  Beat in the eggs and vanilla.  In separate bowl, whisk together flour, baking soda, salt and oats.  Slowly add the flour mixture to the butter mixture.  Stir in the chocolate chips and drop tablespoons full onto a cookie sheet. Bake for 7-9 min or until the cookie starts to brown around the edges. Cool and Enjoy!


Sunday, July 15, 2012

Vanilla Blackberry Scones

This is the best scone recipe I have ever used and best of all no butter is needed.  You can mix up the dry ingredients anytime and then when your ready to bake just add cream (and vanilla if desired). Perfect for those mornings where you would rather spend time sipping coffee on the deck with family or friends then stuck in the kitchen trying to prepare breakfast.  They turn out so moist and fluffy even the non-scone lover can appreciate this treat.  This recipes can also be ubber versatile, just substitute the blackberries, chocolate chips and vanilla with whatever you prefer.  Dried cranberries, cherries, nuts and white chocolate are just a few ideas.  


Vanilla Blackberry Scones

2 c Flour
1/4 c Sugar 
3 tsp Baking Powder
1/2 tsp Salt

1 1/3 Heavy Cream
1 tsp Vanilla 

1 c Dark Chocolate Chips
1 1/2 c Blackberries (can use fresh or frozen)

Mix flour, sugar, baking powder and salt.  Add the cream and vanilla.  Knead until a soft, smooth dough forms. Gently knead in chocolate chips. Roll into a circle about 3/4 of an inch thick.  Sprinkle blackberries on top and cut into 6-8 slices.  Lay the slices a couple inches apart on a cookie sheet and bake 11-13 min at 400 degrees.


Sunday, July 8, 2012

mary janes

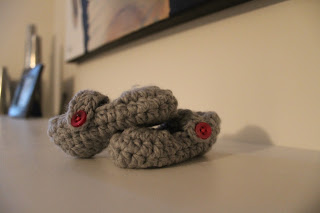
These are such a sweet little pair of mary janes baby booties.  The best part about these is the a-mazing step by step tutorial on You Tube.  The video is especially helpful if you've never crocheted baby shoes before.  Once you've mastered the soles (which I think is the hardest part) you can do tons of different styles of shoes/boots and the bottoms basically stay the same or at least very similar.  If you would rather have just the written pattern you can find it here. http://crochet-mania.blogspot.com/2009/08/crochet-baby-mary-jane-slippers.html


Baby Boots

My first original pattern!! I'm pretty proud of these little boots.  I will write the pattern out and post it later.  I just wanted to get a picture up because I was so excited to finish them.  Is it horrible that I'm so ready for winter to get here so I can start bundling up!?  Also would love to hear some ideas about how to make the bottoms non-slip for my little toddler. 


Saturday, July 7, 2012

Raspberry Cake

I just rediscovered this recipe that I used to make all the time growing up.  I even did a demonstration speech in high school giving instructions to make this.  Back when I was sure someday I would have my own cooking show...   
Anyways I made it again for a 4th of July cookout.  I totally forgot to get a picture right away and it was gone before I could grab a piece for photographing.  I'll have to make it again before I add my own picture. 
I substituted a cup of blueberries in with the raspberries to add that red, white and blue theme.  


Royal Raspberry Cake Recipe
This is the photo that came with the recipe on the Taste of Home website... http://www.tasteofhome.com/Recipes/Royal-Raspberry-Cake  
Mine looked slightly more patriotic :) and was served without ice cream.


Raspberry Cake Recipe


  • 2 cups flour
  • 1/2 tsp salt
  • 1 tbs baking powder
  • 1/3 cup butter, softened
  • 1 cup sugar
  • 1 egg, room temperature
  • 1 cup milk, room temperature
  • 1 tsp vanilla 
  • 2-1/2 cups fresh or frozen raspberries, thawed 
  • 1 cup fresh blueberries

Glaze:
  • 1-1/2 cups confectioners' sugar
  • 2 tbs milk
  • 1/2 tbs butter, melted
  • 1 tsp vanilla extract

  • In a bowl, whisk together the first three ingredients; set aside. In a bowl, cream butter and sugar until light and fluffy. Beat in egg, milk and vanilla. Add dry ingredients, beating well after each addition. Spread into a greased 13-in. x 9-in. baking dish. Spoon berries over top.
  • Bake at 350° for 25-30 minutes or until center of cake springs back when lightly touched. Cool 5 minutes. Combine glaze ingredients, add more milk if your glaze is too thick; spread over cake, leaving berries exposed. 


Summer Baby Hat

This is my first attempt at a crochet summer hat.  I'm very sad that I misjudged the size and it's too small to fit my daughter but oh well an adorable hat anyways.  The flower (which was a gift)  is actually secured to a hair clip and can clip on easily to any hat or headband.   Its a pretty standard crochet flower with a ribbon running through the top of the petals and a sparkly gem glued to the center.  It's just the perfect touch to this hat! 


Thursday, June 28, 2012

BOGO Starbucks Frappuccinos

Buy one get one FREE Starbucks Frappuccinos at participating Target Starbucks.  Hurry deal ends Monday, July 2.  


http://dealnews.com/Starbucks-at-Target-Buy-1-Frappuccino-get-2-nd-free/589090.html

Dark Chocolate Raspberry Bread

So I was trying to find a way to use up some raspberries I had in the fridge and came across a dark chocolate raspberry bread recipe on Pinterest.  Of course I didn't have several of the other ingredients on hand so I had to alter the original recipe. I also cut the sugar content in half.  I do this for most all recipes and no one ever knows the difference.  This post is my version of bread if you want to try the original recipe click here... http://www.recipeboy.com/2012/05/raspberry-dark-chocolate-banana-bread/  They have a way prettier picture of the bread but I can't compare the taste since I only made mine (which was super delicious!)


Dark Chocolate Raspberry Bread


2 c flour
3/4 tsp baking soda
1/2 tsp salt


1/4 c sugar
1/4 c brown sugar
4 Tbs butter softened 
2 eggs


1 mashed banana
1/2 c unsweetened applesauce
1/3 c sour cream
1 tsp vanilla


1 c dark chocolate chips (I use Ghirardelli 60% cacao bittersweet chocolate chips)
1 c halved raspberries lightly tossed in 1 tbs Flour


Preheat oven to 350 degrees F. Lightly butter and flour a 9x5 loaf pan 
Whisk flour, baking soda and salt together in bowl.  With your mixer beat the sugar and butter together. Add eggs beating well after each one.  Add the banana, sour cream and vanilla.  Beat just until blended.  Stir in flour mixture just until moistened. Be careful not to over-mix.  Gently stir in the chocolate chips and raspberries.  
Bake for 50-60 min
A wooden toothpick should come out clean or I never have toothpicks on hand so I use a piece of uncooked spaghetti.


Cool and Enjoy!

Monday, June 25, 2012

Jewelry Sack

This is a super easy little drawstring sack that would be perfect for so many different things.  When we go out I throw a couple little toys and a pacifier in it and my little girl carries it around with her.  I used to throw those items in my purse but this makes it so much easier to find them and my purse doesn't end up being full of toys.  Great for times when lugging a diaper bag around isn't necessary.  Also would be good for and emergency makeup bag or nail supplies or jewelry.  

Anyways it only took a couple hours and one ball of sugar n' cream yarn which runs about $2.50 and you can usually pick it up at walmart or meijer or any regular craft store.   I think if I made an adult version I would add some beads to the ends of the drawstrings but for this one I just knotted the ends.     


                                                                         Closed
                                                                            Open

*Pattern found here
http://www.caron.com/projects/jb/jb_954_bag.html

Dorm Dresser to Entryway Chest


 This is my first experiment with sanding and painting furniture and I have to say I'm pretty pleased with the result.  My brother, just graduating college and moving 500 miles away, asked if I wanted his old dresser.  I've been wanting a new piece of furniture for my entryway and thought maybe this could work so I happily took it off his hands. Since I got the dresser for free the total cost for this project was around $35.  The most expensive part was the new hardware I bought.  Geez those little knobs add up! They were about $3 a piece and of course I needed 8. The rest was small amounts of primer, paint and sandpaper.


                                before


                         after!

Tuesday, June 5, 2012

Beach Bag


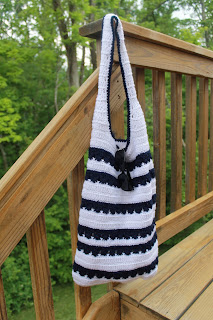
I'm so in love with my latest crochet project.  It makes the perfect bag to take to the pool or beach.  It is super deep so even huge beach towels fit easily.  I used the basic pattern from http://www.freepatterns.com/detail.html?code=FC01034&cat_id=1.  Of course I used my super value yarn and changed up the color pattern to give it a more nautical feel.  I did the cross stitch rows in navy and the other rows in white.  The cross stitch is a little awkward at first but easy to pick up so don't be intimidated by it.

Thursday, May 10, 2012

Crochet Flower

 Flower Pattern
 Pretty time consuming because of all the switching colors (I only used two colors) but I really love the end result. Weaving in all those ends was a nightmare so if I make it again I will only use one color and save myself tons of time.

I used Redheart Super Saver Yarn and a size G hook.  
Ch 5  and join to form ring
Round 1: (Ch 7, sl st into ring) 6 times for six petals
Round 2: Inside each petal work (sc, hdc, dc, 5 tr, dc, hdc, sc) You are working into the space not a stitch               Round 3: Working on the back petals now. Sl st on the center ring inside the first petal. Ch 9 and sl st on the center ring in the next petal. 6 times for 6 petals 
Round 4: same as round 2 then fasten off. 
You can switch colors on the different petals if you want. 
I also like to leave long tails on the flowers until I know what I'm attaching them to


Thursday, April 12, 2012

Easter Leftovers

Considering leftovers make both my husband and I wrinkle our noses in disgust, the thought of having enough leftover food to last for weeks makes us dread all upcoming meals. I left a weeks worth of ham in the fridge and the rest I popped in the freezer.   We did have the typical ham sandwiches one night.  Put ham, cheese and honey mustard dressing on a hamburger bun, wrap in foil and throw in the oven 400* for 10-15 min or until the bread is toasty and the cheese is melted.

The first recipe we used is an all time family favorite.
Creamed Eggs and Ham over toast (serves 3)
6 hard boiled eggs
1 cup Ham
Make up your white sauce* and remove from heat add eggs and ham, season with salt and pepper and serve over toasted bread.  We had a french toast casserole Easter morning so we had leftover french bread to use up.
*To make the white sauce
Melt 3 Tbs Butter in a saucepan over med heat.  Add 3 Tbs Flour, should be a pretty thick consistency.   Whisk in 2-3 cups milk slowly whisking out clumps as you go, continuously stirring over the heat until the sauce thickens
This is always a huge hit at my house and also a Christmas morning tradition.

The next leftover recipe we tried was a ham and potato soup.  I used all our leftover cheesy scalloped potatoes and some of the ham.  Slice up all the potatoes into smaller chunks and dump into a pot.   Add milk, a scoop of sour cream, some green onion (I keep cut up green onion in the freezer at all times)  and ham.  Heat and stir and Voila! I may or may not have eaten 4 bowls...

Wednesday, April 11, 2012

Crochet Carebear

For my baby girl's first Easter I wanted to make her something special.  My favorite toy/character from childhood is the Carebear so I decided to try my hand at making one for Adelaide.  I started crocheting about a month ago, learning on my couch from a variety of youtube videos, so this was a pretty big project for me. I found patterns for all the different bears on this website  http://vintagetoychest.blogspot.com/p/crochet-toy-patterns.html>  I just used the yarn I had on hand so I didn't follow any of the actual color schemes.  Overall it was a pretty easy pattern to follow.  I was a little confused about the yarn thread since I hadn't heard of it much less ever used it.  So I tried using my regular yarn with a super tiny hook and that was very exasperating so I would definitely recommend going out and getting the actual materials listed instead of just winging it.  It will save you time in the long run. Because I didn't have the right yarn my heart turned out bigger than I anticipated so I could only fit one on the tummy but it turned out okay anyways.  Also I took the mouth off because I decided I preferred the bear without it.

Happy Easter Adelaide!